Legend settings and formatting
Overview
Legend is a table on a chart listing and explaining the symbols and colors used, usually along with series and/or point data point names and any other additional information that helps user to understand a chart.
In AnyChart Legend configuration is all the same for all chart types.
You can define where legend should be placed on the chart and even create "floating" legend to save the space.
In this article all legends features and setting are explained and demonstrated.

Enabling/Disabling Legend
To enable legend you have to specify <legend enabled="true"> in <chart_settings> node:
02 |
<legend enabled="True" /> |
Easy Auto Legend for Multi Series Charts
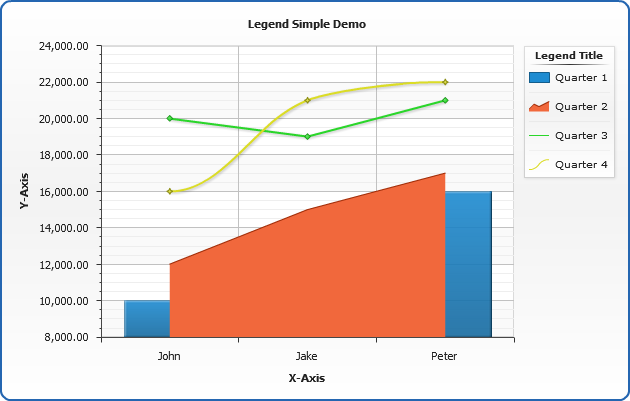
By default legend shows all series names with a symbol that shows the color and the type of the series to the left.
To enable such legend in your chart just enable it:
02 |
<legend enabled="True" /> |
In the live sample, please notice that when you move the mouse over the series name in legend - all series elements are highlighted
Live Sample: Sample Simple Multi Series Legend
Easy Auto Legend for Single Series Charts
If you are showing single series chart and want your legend to show all points names and values you should configure legend:
02 |
<legend enabled="True" ignore_auto_item="True"> |
03 |
<format><![CDATA[{%Name} - {%Value}]]></format> |
05 |
<item source="Points" /> |
Short explanation: as you can see we've enabled a legend, created <items> subnode and placed <item source="Points"> node in it - to show all points from the chart. Also we've specified a legend items format - to show Point Icon, Point Name and Value. And the last thing - we've set ignore_auto_item="True" - to force legend not to show series in legend.
In the live sample, please notice that when you move the mouse over an element in legend - point is highlighted:
Live Sample: Sample Simple Single Series Legend
Enabling/Disabling Legend Title
Sometimes you need the title to a legend and sometimes it is superfluous: to disable legend title you have to specify <title enabled="false"> subnode in <legend> node, as shown in Single Series Legend Sample above:
02 |
<legend enabled="True"> |
03 |
<title enabled="false" /> |
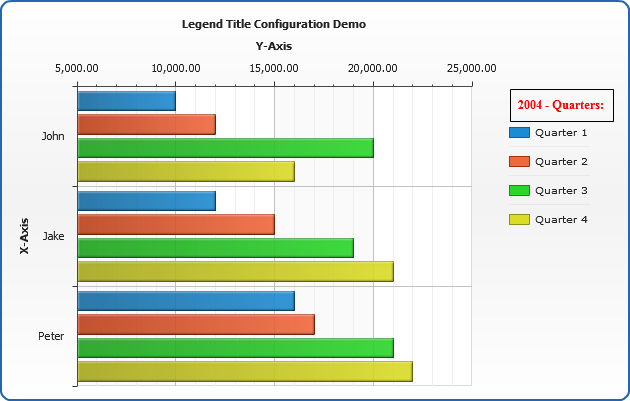
To specify and format your own title for the legend use <text>, <font> and <background> subnodes of <title> node. For more information about background setting please refer to common background tutorial, about font - font tutorial.
02 |
<legend enabled="True"> |
03 |
<title enabled="True"> |
04 |
<text><![CDATA[Series:]]></text> |
05 |
<font bold="True" color="Red" family="Arial" /> |
06 |
<background enabled="True"> |
07 |
<border enabled="True" /> |
Here is a sample bar chart with formatted title:
Live Sample: Sample Legend Title Formatting
Adding Markers Symbols to Series Icon
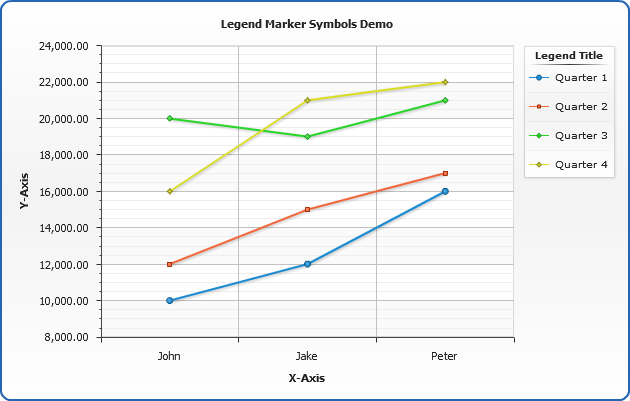
When you are working with line and spline chart you may use markers to distinguish different
series. Be default AnyChart doesn't show marker symbols in legend - only color representation is used in a
small line icon. If you want to show markers in legend icons you have to set the following in legend XML:
01 |
<legend enabled="true"> |
03 |
<marker enabled="true" /> |
Please take a look at the sample line chart with several series and markers
enabled both on the plot and in legend:
Live Sample: Sample Legend Marker Symbols
NOTE: Not only line and spline charts can have and show markers - all other types can have marker and shown
it in legend icon.
Positioning Legend
Position
Depending on the layout and type of your chart you can position legend to a desired place using position attribute of <legend> node. Possible values for position node are: Left,
Right,
Top,
Bottom and
Float.
Legend is positioned as any other Control, read more about it in Controls and Controls Positioning.
Size
By default the size of the legend is calculated automatically, but, no matter what position mode you use, you can set width an height for the legend using width and height attributes of <legend> node. If it would not be possible to place all legend items in a legend of the specified size - scroll bar will appear. Width and height can be set both in pixels - for example, width="150" or in percents, for example width="50%". When setting percent value - you are setting it against chart width/height or data plot width/height - depending on align_by attribute value.
Align
When working with non-Float positions you can align legend to a desired side of the chart using align attribute, its possible values are: Near,
Far, Center and
Spread.
Near, Far, Center action depends on value of position attribute, for example "Near" align for "Left" position will mean that legend is placed to the Top Left corner of the chart.
Spread align will make legend to stretch out to all available space on the Top, Bottom, Right or Left of the chart.
You can control whether legend is aligned or spread by data plot or all chart using align_by attribute, its possible values are DataPlot and Chart.
The space between data plot and legend is controlled using padding attribute.
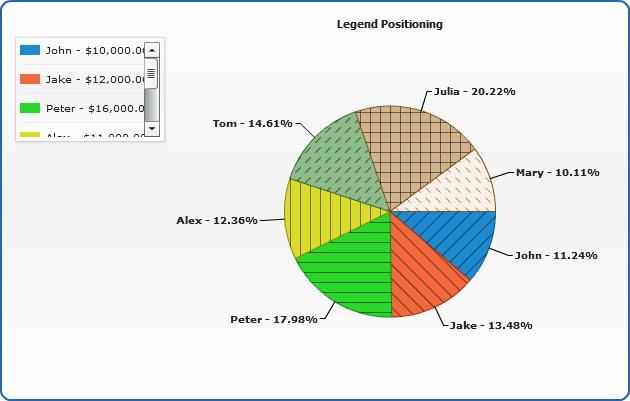
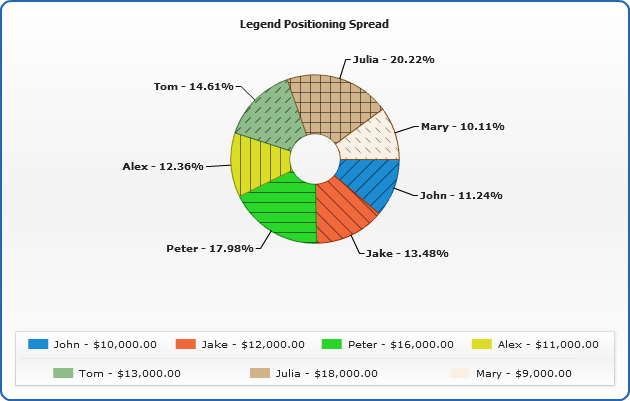
Sample Pie Chart with a legend of a fixed (150px - width, 30% of data plot height) size positioned to the "Left" of the chart, aligned to " Near", with padding of 0 pixels:
Live Sample: Sample Legend Positioning
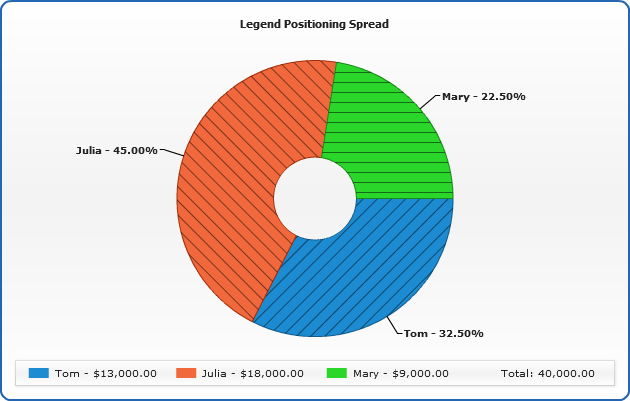
The same Sample Donut Chart with a legend spread to the "Bottom" of the chart, with padding of 50 pixels:
Live Sample: Sample Legend Spread Mode
When you set position to "Float" you can set the place where it will appear on chart render using anchor attribute of <legend> node its possible values are: LeftTop, CenterTop, RightTop, RightBottom, CenterBottom, LeftBottom and
Center. They depend on the value of align_by attribute.
Anchor point may be modified using horizontal_padding and vertical_padding attributes of <legend> node.
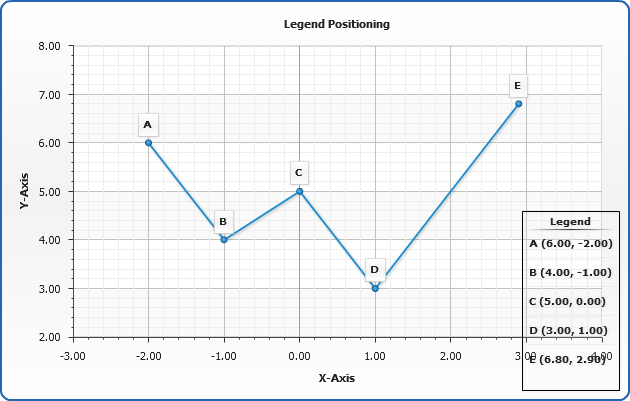
Sample Scatter Line Chart with a floating legend with the height of 150 anchored to "RightBottom" of the chart with the paddings of 10:
Live Sample: Sample Floating Legend
Legend Background
Legend background allows you to configure the border and the fill of the legend, to learn more about background setting please study the common background tutorial.
Formatting Legend Items
Using legend format you can specify what data should be shown in legend, how it should be formatted and arranged. Formatting is set using <format> subnode of <legend> node, like that:
01 |
<legend enabled="True"> |
02 |
<format><![CDATA[Series: {%Icon} {%Name}]]></format> |
This formatting will be applied to all items if the legend, but in normal mode - you can override it
for certain elements.
When formatting items you can use Point and Series keywords listed in the end of this article, and Custom Attributes of the series or point, this topic is covered in Custom Attributes chapter.
Point and Series Keywords are used in conjunction with automatic keyword - see next chapter.
More information about formatting can be found in Keywords and Formatting tutorial and Number Formatting tutorial. Font settings for legend item are defined in <font> subnode of <legend> node, learn how to configure font in Fonts tutorial.
Automatic Items
When creating legend you can use so called automatic items, they allow you to customize legend easily. The big advantage of automatic items is that they create interactive legend items that highlight the series or the point they are describing.
To add or modify legend items add <items> subnode in <legend> node:
01 |
<legend enabled="True" ignore_auto_item="true"> |
03 |
<items source="Series" /> |
04 |
<items source="Points" /> |
05 |
<items source="Points" series="SeriesName" /> |
06 |
<items source="Series" series="SeriesName" /> |
Each automatic item have attributes source which can be "Points" or "Series" and series,
that specifies the series name (if needed). The following table explain what each of automatic items will place in the legend.
| Item |
Description |
| <item source="Series"/> |
All series from the chart. |
| <item source="Points"/> |
All points from all series from the chart. |
| <item source="Categories"/> |
All categories (different items names) from the chart. |
| <item source="Points" series="SeriesName"/> |
All points from the specified series. |
| <item source="Series" series="SeriesName"/> |
The specified series. |
| <item source="Points" category="CategoryName"/> |
All points from the specified category. |
| <item source="Categories" category="CategoryName" /> |
The specified category. |
In Normal Legend mode you can set custom format for each item
To set format for an item - create <text> subnode in item attribute and format them as described in formatting chapter above.
The sample of automatic items usage and legend settings can be found in Custom Attributes In Legend Chart Sample.
In automatic items formatting you can use all keywords listed in the table in the end of this article, but notice that automatic item that return series can't use point keywords.
Custom Items
When creating legend you can add your own items with any information you want to see on the legend,
to do that just add <items> subnode and add as many <item> nodes as you need with <text> subnode in them, that contain essential data.
01 |
<legend enabled="True" ignore_auto_item="True"> |
04 |
<text><![CDATA[Aggregate Data For EU]]></text> |
07 |
<text><![CDATA[according to annual report]]></text> |
10 |
<icon type="SeriesIcon" series_type="Bar" /> |
11 |
<text><![CDATA[{%Icon} Total sales: {%DataPlotYSum}]]></text> |
Note: attribute ignore_auto_item="True" is used to stop AnyChart from adding default data to legend, if you'd like this data to remain in legend - just set ignore_auto_item="False".
Note: use <icon> subnode to add charts series icon to the item.
In the sample chart below we've used custom item it add Total data to legend. Total will be calculated
by AnyChart using {%DataPlotYSum} keyword. In custom items you can use Data Plot, Y-Axis and X-Axis keywords.
Live Sample: Sample Legend Custom Items
Normal Legend
In normal legend mode all legend items are treated as single blocks, you can set how many rows and columns legend should have, format rows and columns separators, paddings between rows and columns and set the legend title.
To create a normal legend set mode="Normal":
01 |
<legend mode="Normal" enabled="True" /> |
Normal Legend Appearance
Headers
You can configure the visual appearance of the table headers and columns.
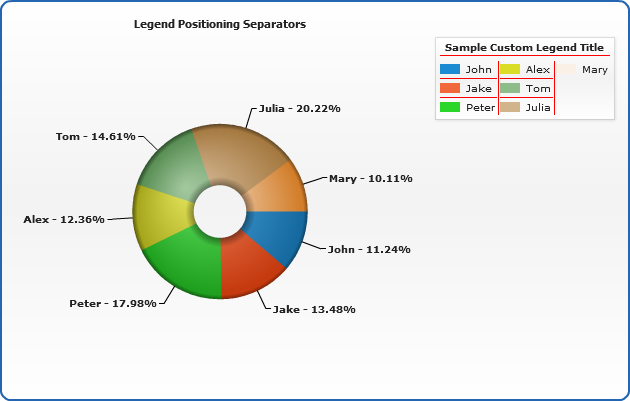
Separators
There are three separators that you can configure in Normal legend: rows separator, columns separator and title separator. They are configured in <rows_separator>, <columns_separator> and <title_separator> subnodes of <legend> node, like that, for example:
01 |
<legend enabled="True"> |
02 |
<rows_separator color="Black" /> |
03 |
<columns_separator color="Black" /> |
04 |
<title_separator enabled="False" /> |
All separators are simply the lines and you should study Lines and Borders tutorial to understand how
to configure them.
Live Sample: Sample Normal Legend Appearance Separator
Custom Attributes in Legend
Additional information stored in databases can be attached to data points and series and used in a chart to provide further information in a tooltip, an element's label or within a legend. This can make creation of tooltips and labels easier - once configured, they can easily be modified and you can concentrate only on data extraction.
Custom attributes are specified within <attributes> subnode of <series> or <point> nodes, each attribute has a unique name, which can be used (with a % prefix, in braces) as a keyword in labels text.
To attach custom attribute to a point or series the following syntax is used:
02 |
<attribute name="id"><![CDATA[value]]></attribute> |
03 |
<attribute name="id2"><![CDATA[value2]]></attribute> |
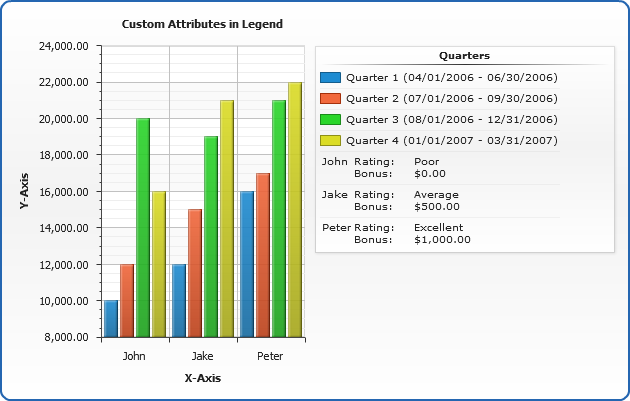
In the sample below we will attach quarters duration to all quarters
series and sales bonus amount and rating to the first quarter series. This will look like that (only one point shown):
01 |
<series name="Quarter 1"> |
03 |
<attribute name="duration"><![CDATA[04/01/2006 - 06/30/2006]]></attribute> |
05 |
<point name="John" y="10000"> |
07 |
<attribute name="rating"><![CDATA[Poor]]></attribute> |
08 |
<attribute name="bonus"><![CDATA[0]]></attribute> |
Now we want to show this data in legend, to do that we need to create custom items and format them,
specifying the right attributes for series and for point items of the legend:
01 |
<legend enabled="true" ignore_auto_item="False" position="Right" align="Spread"> |
02 |
<title enabled="true"> |
03 |
<text><![CDATA[Quarters]]></text> |
06 |
<item source="Series"> |
07 |
<text><![CDATA[{%Icon} {%Name} ({%duration})]]></text> |
10 |
<text><![CDATA[Quarter 1 Details]]></text> |
12 |
<item source="Points" series="Quarter 1"> |
Sample Column chart with legend constructed using custom series and point attributes:
Live Sample: Sample Custom Attributes in Legend
Setting maximum of visible characters
Whether you use series names or custome attributes in the legend items, if the value (a number or a text) is to large, you may want to limit the number of characters using maxChar keyword. This parameters sets the maximal number of symbols, that are displayed.
For example if the length of the string in {%Token} is greater than maxChar, then it will be trimmed and symbols set in maxCharFinalChars (by default "...") are shown at the end (this is done to show explicitly, that string is trimmed).
If the number of characters in {%Token} is less than or equal to maxChar, then {%Token}
is displayed as is.
If you don't want to show anything when value is trimmed - just set maxCharFinalChars to nothing.
Sample setting maximum of visible characters to 1 and no final characters:
01 |
<format><![CDATA[{%Icon} {%Name}{maxChar:1,maxCharFinalChars:} - ${%Value}]]></format> |
In the sample chart below we've used this settings.
Live Sample: Sample setting maximum of visible characters
Keywords reference
In the tables below you can find all built-in keywords that can be used in legend items texts,
in Description column you an find notices that identify in what chart types keyword will be active. If
a certain attribute value stands behind keyword - you will find thin attribute in Attribute column.
Legend keywords
| Name |
Description |
| {%Icon} |
Returns series or point specific icon. |
Point keywords
This table list all built-in keywords that provide point data and point-related precalculated values.
| Keyword |
Description |
Attribute |
| {%Value} = {%YValue} |
The y value of this point. |
<point y=""/> |
| {%YValue} |
The y value of this point. |
<point y=""/> |
| {%YPercentOfCategory} |
The percentage of all the points with the same name this point represents. |
|
| {%YPercentOfSeries} |
The percentage of the series this point represents. |
|
| {%YPercentOfTotal} |
The percentage of all the series on the chart this point represents. |
|
| {%High} |
The high value of this point (OHLC, Candlestick). |
<point high=""/> |
| {%Low} |
The low value of this point (OHLC, Candlestick). |
<point low=""/> |
| {%Open} |
The open value of this point (OHLC, Candlestick). |
<point open=""/> |
| {%Close} |
The close value of this point (OHLC, Candlestick). |
<point close=""/> |
| {%XValue} |
The x value of this point (Scatter Plot charts). |
<point x=""/> |
| {%XPercentOfSeries} |
The percentage of the series this point represents (Scatter Plot charts). |
|
| {%XPercentOfTotal} |
The percentage of all the series on the chart this point represents. |
|
| {%BubbleSize} |
The bubble size value of this point (Bubble chart). |
<point size=""/> |
| {%BubbleSizePercentOfCategory} |
The percentage of all the points with the same name this point represents (Categorized charts). |
|
| {%BubbleSizePercentOfSeries} |
The percentage of the series this point represents. |
|
| {%BubbleSizePercentOfTotal} |
The percentage of all the series on the chart this point represents. |
|
| {%Name} |
The name of this point. |
<point name=""/>
|
| {%Index} |
The index of this point in the series this point represents (zero-based). |
|
| {%RangeStart} |
The starting value of this point (Range charts). |
<point start=""/> |
| {%RangeEnd} |
The ending value of this point (Range charts). |
<point end=""/> |
| {%Range} |
The range of this point (RangeEnd - RangeStart). |
|
Series keywords
This table list all built-in keywords that provide series data and series-related precalculated values.
| Keyword |
Description |
Attribute |
| {%SeriesName} |
The name of this series. |
<series name=""/> |
| {%SeriesFirstXValue} |
The x value of the first point in this series (Scatter plot charts). |
|
| {%SeriesFirstYValue} |
The y value of the first point in this series. |
|
| {%SeriesLastXValue} |
The x value of the last point in this series (Scatter plot charts). |
|
| {%SeriesLastYValue} |
The y value of the first point in this series. |
|
| {%SeriesYSum} |
The sum of all the points y values. |
|
| {%SeriesXSum} |
The sum of all the points x values (Scatter plot charts). |
|
| {%SeriesBubbleSizeSum} |
The sum of all the points bubble sizes (Bubble chart). |
|
| {%SeriesYMax} |
The maximal y value of all the elements within this series. |
|
| {%SeriesYMin} |
The minimal y value of all the elements within this series. |
|
| {%SeriesXMax} |
The maximal x value of all the elements within this series (Scatter plot charts). |
|
| {%SeriesXMin} |
The minimal x value of all the elements within this series (Scatter plot charts). |
|
| {%SeriesBubbleMaxSize} |
The maximal bubble size value of all the points within this series (Bubble chart). |
|
| {%SeriesBubbleMinSize} |
The minimal bubble size value of all the points within this series (Bubble chart). |
|
| {%SeriesYAverage} |
The average y value of all the points within this series. |
|
| {%SeriesXAverage} |
The average x value of all the points within this series. |
|
| {%SeriesBubbleSizeAverage} |
The average bubble size value of all the points within this series (Bubble chart). |
|
| {%SeriesYMedian} |
The median y value of all the points within this series. |
|
| {%SeriesXMedian} |
The median x value of all the points within this series (Scatter plot charts). |
|
| {%SeriesBubbleSizeMedian} |
The median bubble size value of all the points within this series (Bubble chart). |
|
| {%SeriesYMode} |
The mode y value of all the points within this series. |
|
| {%SeriesXMode} |
The mode x value of all the points within this series (Scatter plot charts). |
|
| {%SeriesBubbleSizeMode} |
The mode bubble size value of all the points within this series (Bubble chart). |
|
| {%SeriesPointCount} |
The number of points in this series. |
|
| {%SeriesYAxisName} |
The title text of the Y Axis. |
|
| {%SeriesXAxisName} |
The title text of the X Axis. |
|
| {%SeriesYRangeMax} |
The maximal range in this series (Range charts). |
|
| {%SeriesYRangeMin} |
The minimal range in this series (Range charts). |
|
| {%SeriesYRangeSum} |
The sum of all ranges in this series (Range charts). |
|
Category
This table list all built-in keywords that provide category data and category-related precalculated values.
When creating categorized charts category is a set of points within the chart with the same name.
| Keyword |
Description |
| {%CategoryYPercentOfTotal} |
The percent of all the data on the chart this category represents. |
| {%CategoryYSum} |
The sum of all the points within this category. |
| {%CategoryYAverage} |
The average of all the points within this category. |
| {%CategoryYMedian} |
The median of all the points within this category. |
| {%CategoryYMode} |
The mode of all the points within this category. |
| {%CategoryName} |
The name of the category. |
| {%CategoryYRangeMax} |
The maximal range in this category (Range charts). |
| {%CategoryYRangeMin} |
The minimal range in this category (Range charts). |
| {%CategoryYRangeSum} |
The sum of all ranges in this category (Range charts). |
Data Plot
This table list all built-in keywords that provide category data and category-related precalculated values.
| Keyword |
Description |
| {%DataPlotYSum} |
The sum of all the points y values. |
| {%DataPlotXSum} |
The sum of all the points x values (Scatter plot charts). |
| {%DataPlotBubbleSizeSum} |
The sum of all the points bubble sizes (Bubble chart). |
| {%DataPlotYMax} |
The maximal of all the points y values. |
| {%DataPlotYMin} |
The minimal of all the points y values. |
| {%DataPlotXMax} |
The maximal of all the points x values (Scatter plot chart). |
| {%DataPlotXMin} |
The minimal of all the points x values (Scatter plot chart). |
| {%DataPlotBubbleMaxSize} |
The maximal of all the points bubble sizes (Bubble chart). |
| {%DataPlotBubbleMinSize} |
The minimal of all the points bubble sizes (Bubble chart). |
| {%DataPlotXAverage} |
The average x value of all the points (Scatter plot charts). |
| {%DataPlotYAverage} |
The average y value of all the points. |
| {%DataPlotBubbleSizeAverage} |
The average bubble size of all the points (Scatter plot charts). |
| {%DataPlotMaxYValuePointName} |
The name of the point with a maximal of all the points y values. |
| {%DataPlotMinYValuePointName} |
The name of the point with a minimal of all the points y values. |
| {%DataPlotMaxYValuePointSeriesName} |
The name of the series with a maximal of all the points y values. |
| {%DataPlotMinYValuePointSeriesName} |
The name of the series with a minimal of all the points y values. |
| {%DataPlotMaxYSumSeriesName} |
The name of the series with a maximal sum of the points y values. |
| {%DataPlotMinYSumSeriesName} |
The name of the series with a minimal sum of the points y values. |
| {%DataPlotYRangeMax} |
The maximal of the ranges of the points within the chart. |
| {%DataPlotYRangeMin} |
The minimal of the ranges of the points within the chart. |
| {%DataPlotYRangeSum} |
The sum of the ranges of the points within the chart. |
| {%DataPlotPointCount} |
The number of the points within the chart. |
| {%DataPlotSeriesCount} |
The number of the series within the chart. |
Y Axis
This table list all built-in keywords that provide Y axis data and y axis-related precalculated values.
| Keyword |
Description |
| {%YAxisSum} |
The sum of all y values of all points in series that are bound to this axis. |
| {%YAxisBubbleSizeSum} |
The sum of all bubble sizes of all points in series that are bound to this axis. |
| {%YAxisMax} |
The maximal y value of all points in series that are bound to this axis. |
| {%YAxisMin} |
The minimal y value of all points in series that are bound to this axis. |
| {%YAxisScaleMax} |
The maximal scale value. |
| {%YAxisScaleMin} |
The minimal scale value. |
| {%YAxisBubbleSizeMax} |
The maximal bubble size of all points in series that are bound to this axis. |
| {%YAxisBubbleSizeMin} |
The minimal bubble size of all points in series that are bound to this axis. |
| {%YAxisAverage} |
The average y value of all points in series that are bound to this axis. |
| {%YAxisMedian} |
The median y value of all points in series that are bound to this axis. |
| {%YAxisMode} |
The mode y value of all points in series that are bound to this axis. |
| {%YAxisName} |
The name of the axis. |
X Axis
This table list all built-in keywords that provide X axis data and x axis-related precalculated values. Only for Scatter plot charts.
| Keyword |
Description |
| {%XAxisSum} |
The sum of all x values of all points in series. |
| {%XAxisBubbleSizeSum} |
The sum of all bubble sizes of all points in series. |
| {%XAxisMax} |
The maximal x value of all points in series. |
| {%XAxisMin} |
The minimal x value of all points in series. |
| {%XAxisScaleMax} |
The maximal scale value. |
| {%XAxisScaleMin} |
The minimal scale value. |
| {%XAxisBubbleSizeMax} |
The maximal bubble size of all points in series. |
| {%XAxisBubbleSizeMin} |
The minimal bubble size of all points in series. |
| {%XAxisAverage} |
The average x value of all points in series. |
| {%XAxisMedian} |
The median x value of all points in series. |
| {%XAxisMode} |
The mode x value of all points in series. |
| {%XAxisName} |
The name of the axis. |