Needle Pointer Style

Overview

Available Settings

Full XML List:

XML Syntax
Plain code
01 <needle_pointer_style name="" parent="" color="" hatch_type="" radius="" base_radius="" thickness="" point_thickness="" point_radius="">
02   <fill />
03   <hatch_fill />
04   <border />
05   <effects />
06   <cap enabled="" radius="">
07     <inner_stroke />
08     <outer_stroke />
09     <background />
10     <effects />
11   </cap>
12   <states>
13     <normal />
14     <hover />
15     <pushed />
16     <selected_normal />
17     <selected_hover />
18   </states>
19 </needle_pointer_style>

Description

Needle Pointer Style is a style used for circular gauges. It has a quite large number of attributes so let's examine them thoroughly.

name specifies a name that must be unique for each element. parent points on a parent object, if it exists, from which it will receive parameters. The destination of color and hatch_color nodes is evident.

What concerns needles. radius is a total length of a pointer. point_radius is length of the pointer's ending and base_radius - length of pointer's base part. Sometimes it is useful to set a negative value for base_radius to make your pointer be displayed on both sides of your pointer basement. And, finally, thickness and point_thickness are responsible for thickness of the pointer at its base and at its end respectively.

Now some words about cap node. Cap is a round gizmo that is drawn in the center of your circular gauge. Inside it has only two attributes:enabled and radius. Cap may have effects and its visual appearance are set by background subnode and subnodes describing 2 borders: inner_stroke and outer_stroke.

to top

Needle Pointer Style usage example

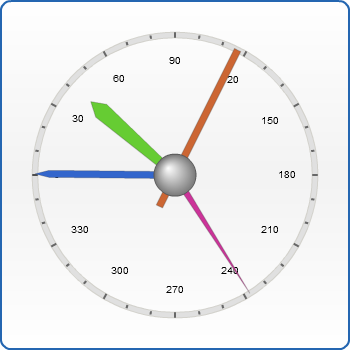
Now let's create a simple example of needle pointer styles usage. We will create for needle pointers with different styles for each one. Let's start.

First needle is supposed to be of rectangular size, of the same thickness and point_thickness. It must also have a short "tail" at the back side of the cap. This is done by setting negative value to base_radius attribute. So, the first style is this:

XML Syntax
Plain code
01 <needle_pointer_style name="needle_style_1" thickness="5" point_thickness="5" base_radius="-25">
02   <fill enabled="true" type="solid" color="#CC6633" />
03 </needle_pointer_style>

Second needle will be shorter than others ("80" value for radius attribute) and will be thickened near its This is done by setting point_radius to "10" and making point_thickness more than thickness. XML for the second needle pointer style:

XML Syntax
Plain code
01 <needle_pointer_style name="needle_style_2" thickness="5" point_thickness="12" point_radius="10" radius="80">
02   <fill enabled="true" type="solid" color="#66CC33" />
03 </needle_pointer_style>

The third style is very similar to the previous one with two exclusions: the pointer is of normal length and it isn't thicker at its end, although it's also sharpened:

XML Syntax
Plain code
01 <needle_pointer_style name="needle_style_3" thickness="5" point_thickness="5" point_radius="10">
02   <fill enabled="true" type="solid" color="#3366CC" />
03 </needle_pointer_style>

And the forth style is very simple. We just change pointer thickness from "5" to "0":

XML Syntax
Plain code
01 <needle_pointer_style name="needle_style_4" thickness="5" point_thickness="0">
02   <fill enabled="true" type="solid" color="#CC3399" />
03 </needle_pointer_style>

Now we simply group all styles together, create 4 different pointers with various values and apply styles to them. The XML and the result are below:
XML Syntax
Plain code
01 <?xml version="1.0" encoding="UTF-8"?>
02 <anychart>
03   <gauges>
04     <gauge>
05       <circular>
06         <pointers>
07           <pointer type="Needle" value="116.57" style="needle_style_1" />
08           <pointer type="Needle" value="41.19" style="needle_style_2" />
09           <pointer type="Needle" value="0.57" style="needle_style_3" />
10           <pointer type="Needle" value="237.63" style="needle_style_4" />
11         </pointers>
12         <styles>
13           <needle_pointer_style name="needle_style_1" thickness="5" point_thickness="5" base_radius="-25">
14             <fill enabled="true" type="solid" color="#CC6633" />
15           </needle_pointer_style>
16           <needle_pointer_style name="needle_style_2" thickness="5" point_thickness="12" point_radius="10" radius="80">
17             <fill enabled="true" type="solid" color="#66CC33" />
18           </needle_pointer_style>
19           <needle_pointer_style name="needle_style_3" thickness="5" point_thickness="5" base_radius="0" point_radius="10">
20             <fill enabled="true" type="solid" color="#3366CC" />
21           </needle_pointer_style>
22           <needle_pointer_style name="needle_style_4" thickness="5" point_thickness="0" base_radius="0">
23             <fill enabled="true" type="solid" color="#CC3399" />
24           </needle_pointer_style>
25         </styles>
26       </circular>
27     </gauge>
28   </gauges>
29 </anychart>


Live Sample:  Needle Pointer Style Sample 1

to top

States Supported

This style supports the following states: normal, hover, pushed, selected_normal, selected_hover.

to top