Vertical Gauge Pointers
Overview
Pointers on Gauges are special signs for showing your gauges' values. You can even create pointers that will be updated dynamically - manually or programmatically. See Interactive gauges for more. Pointers are a large separate object and have lots of nodes that determine their visual appearance and behavior on the gauge. For example you can totally change the look of pointers, assign attributes or actions to them, bind them to a certain axis and so on. Almost always pointers are a' must-have" element on your gauge.

Types of pointers
In AnyChart Vertical Gauges we have 5 types of pointers: Bar Pointer, Marker Pointer, Tank Pointer, Thermometer Pointer, Range Bar Pointer. Here are descriptions for all of them:
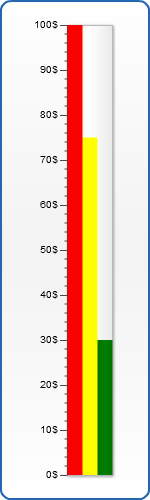
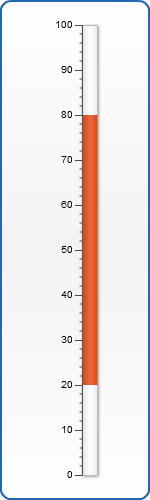
Bar Pointer
Bar pointer is a line of certain width that goes from the beginning of your axis to the value specified by value attribute. You can specify its position and fill/hatch fill. That's an example of using bar pointers: we have some of them, of different color and position:
Live Sample: vertical bar style sample
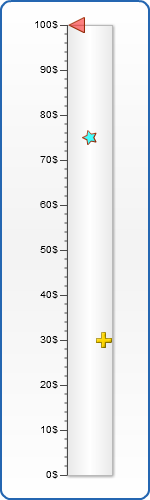
Marker Pointer
Marker pointer uses a figure of certain shape for pointing your axis current values. As well as in case of bar pointer you can use several markers on your gauge:
Live Sample: vertical marker style sample
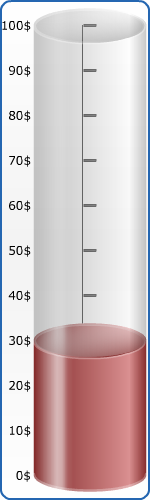
Tank Pointer
Tank Pointer imitates a barrel filled with some liquid. This type of gauge is very attractive and simply-adjusted, as it has almost the same attributes as Bar Pointer
Live Sample: vertical tank style sample
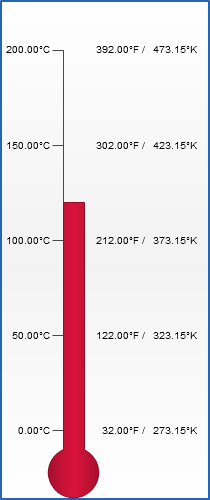
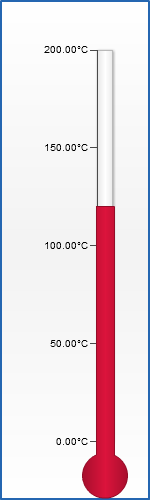
Thermometer Pointer
Thermometer pointer, as you can understand it from its name, indicates a mercurial thermometer. In addition to the width of your thermometer bar you can configure your thermometer's bulb properties.
Live Sample: vertical thermometer style sample
Range Bar Pointer
Range Bar Pointer differs from the regular Bar Pointer with one thing: you can set not a single value for your pointer, but both start value and end value.
Live Sample: vertical range bar style sample
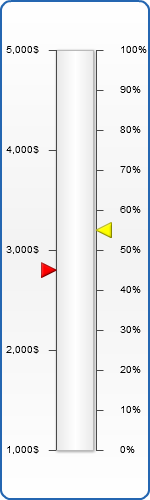
Binding pointers to axes
You can bind a certain pointer or pointers to any axis you want (of course at first you need to define this axes in extra_axes node). To do it just specify the axis attribute of your pointer. If the axis attribute is not specified the pointer is bound to primary axis. In this example marker pointer is bound to primary axis($) and bar pointer is inverted and bound to additional axis(%):
Live Sample: vertical binding style sample
Label
You can add a label to any pointer you want to show your scale value. Label acts as a part of pointer, or you can easily move pointer with it, if pointer id editable. Typical XML for label looks like this:
03 |
<position placement_mode="" halign="" valign="" x="" y="" padding="" width="" height="" spread="" anchor="" /> |
The position subnode attributes have the following values:
| <position> |
| Attribute |
Values |
Default |
Description |
| placement_mode |
ByPoint | ByRectangle | ByAnchor |
Center |
Defines the label pointer placement method. |
| halign |
Left | Center | Right |
Center |
Sets vertical label pointer align. |
| valign |
Top | Center | Bottom |
Center |
Sets vertical label pointer align. |
| padding |
Number |
|
Sets the padding for label pointer in percents. |
| x |
Number |
|
Sets the "x" coordinate of your label pointer in percents. |
| y |
Number |
|
Sets the "y" coordinate of your label pointer in percents. |
| width |
Number |
Auto |
Sets the width of your label pointer. |
| height |
Number |
Auto |
Sets the height of your label pointer. |
| spread |
Boolean |
False |
Sets whether label pointer background is spread to the label pointer container. |
| anchor |
LeftTop | CenterTop | RightTop | CenterLeft | Center | CenterRight | LeftBottom | CenterBottom | RightBottom |
CenterTop |
Sets the anchor point for label pointer. |
Almost all attributes are the same as for Extra labels. Look for the explanation there. The only difference is an "anchor" function. position node has a "ByAnchor" value of placement_mode attribute. If it is "ByAnchor" the label is always positioned at one side of the pointer. The possible anchor values are listed in description of anchor attribute above.
Let's look at the example. We take thermometer pointer and add label for it. We want to display the value of our thermometer inside the thermometer bar. So placement_mode should be set to "ByAnchor" and anchor - to "CenterBottom". We also set a little padding, disable background for the label and make the font white. XML is as follows:
02 |
<pointer type="Thermometer" value="120" color="#DC143C"> |
03 |
<thermometer_pointer_style width="20" bulb_radius="15" /> |
05 |
<position placement_mode="ByAnchor" anchor="CenterBottom" height="20" padding="2" /> |
06 |
<background enabled="false" /> |
07 |
<font color="white" bold="true" size="11" /> |
That's what we get:
Live Sample: vertical label pointer style sample
Tooltip
You can add a tooltip to any pointer you want to show value or some other data. Typical XML for tooltip looks like this:
05 |
<format><![CDATA[Value: {%Value}]]></format> |
You can disable tooltip, if you don't need it:
02 |
<tooltip enabled="false" /> |