Vertical Gauge Custom Labels Configuration
Overview
If you would like to specify some area you may add a custom label, adjust its parameters and set a custom marker for it. The custom label may be added for some tickmark or for area that doesn't have tickmarks.
Adding custom label
To add a custom labels first of all you need to create an custom_labels node. Then to create a specific custom label define it in custom_label node by pointing its value, that should lie within ranges of your current axis scale. The later actions are the same as for labels node when creating usual labels, but you should use text node instead of labels.
Typical XML settings for the custom label are:
03 |
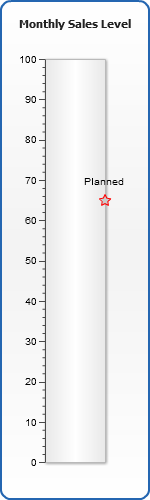
<custom_label value="65" enabled="true"> |
04 |
<label align="Outside" enabled="true" padding="10"> |
05 |
<format><![CDATA[Planned]]></format> |
07 |
<tickmark enabled="false" /> |
Adding tickmarks for custom labels
For better visualization of custom label position you can add the tickmark, which is configured in the same way as regular tickmarks:
03 |
<custom_label value="65" enabled="true"> |
04 |
<label align="Outside" enabled="true" padding="-1"> |
05 |
<position valign="Top" halign="Center" padding="10" /> |
06 |
<format><![CDATA[Planned]]></format> |
08 |
<tickmark enabled="true" shape="Star5" width="10" length="10" align="Outside" padding="-5" /> |
Here is a sample of a gauge with custom label:
Live Sample: Sample Linear Vertical Custom Labels